
使用鼠标库,你可以使用Arduino Leonardo,Micro或Due来控制计算机的屏幕光标。
这个特殊的例子使用五个按钮来移动屏幕上的光标。四个按钮是方向性的(上,下,左,右),一个是用于鼠标左键单击。来自Arduino的光标移动总是相对的。每次读取输入时,光标的位置都会相对于当前位置进行更新。
只要有一个方向按钮被按下,Arduino就会移动鼠标,在合适的方向上将HIGH输入映射到5的范围。
第五个按钮用于控制来自鼠标的左键单击。当按钮被释放时,计算机将识别事件。
必需的组件
你将需要以下组件:
- 1 × Breadboard 面包板
- 1 × Arduino Leonardo, Micro 或 Due板
- 5 × 10k欧姆电阻
- 5 × 瞬时按钮
程序
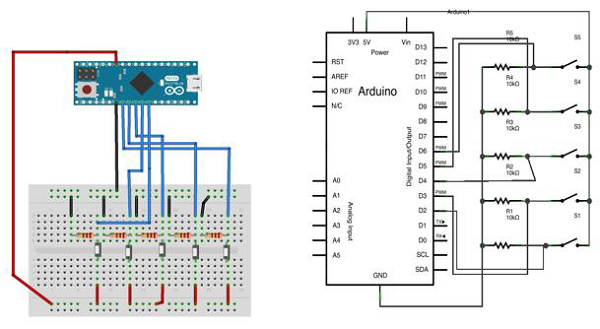
按照电路图连接面包板上的组件,如下图所示。

草图
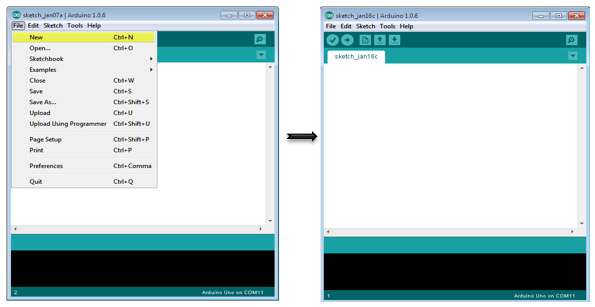
在计算机上打开Arduino IDE软件。使用Arduino语言进行编码控制你的电路。通过单击“New”打开一个新的草图文件。
对于本例,你需要使用Arduino IDE 1.6.7
Arduino代码
/*
   Button Mouse Control
   For Leonardo and Due boards only .Controls the mouse from
   five pushbuttons on an Arduino Leonardo, Micro or Due.
   Hardware:
   * 5 pushbuttons attached to D2, D3, D4, D5, D6
   The mouse movement is always relative. This sketch reads
   four pushbuttons, and uses them to set the movement of the mouse.
   WARNING: When you use the Mouse.move() command, the Arduino takes
   over your mouse! Make sure you have control before you use the mouse commands.
*/

#include "Mouse.h"
// set pin numbers for the five buttons:
const int upButton = 2;
const int downButton = 3;
const int leftButton = 4;
const int rightButton = 5;
const int mouseButton = 6;
int range = 5; // output range of X or Y movement; affects movement speed
int responseDelay = 10; // response delay of the mouse, in ms

void setup() {
   // initialize the buttons' inputs:
   pinMode(upButton, INPUT);
   pinMode(downButton, INPUT);
   pinMode(leftButton, INPUT);
   pinMode(rightButton, INPUT);
   pinMode(mouseButton, INPUT);
   // initialize mouse control:
   Mouse.begin();
}

void loop() {
   // read the buttons:
   int upState = digitalRead(upButton);
   int downState = digitalRead(downButton);
   int rightState = digitalRead(rightButton);
   int leftState = digitalRead(leftButton);
   int clickState = digitalRead(mouseButton);
   // calculate the movement distance based on the button states:
   int xDistance = (leftState - rightState) * range;
   int yDistance = (upState - downState) * range;
   // if X or Y is non-zero, move:
   if ((xDistance != 0) || (yDistance != 0)) {
      Mouse.move(xDistance, yDistance, 0);
   }

   // if the mouse button is pressed:
   if (clickState == HIGH) {
      // if the mouse is not pressed, press it:
      if (!Mouse.isPressed(MOUSE_LEFT)) {
         Mouse.press(MOUSE_LEFT);
      }
   } else {                           // else the mouse button is not pressed:
      // if the mouse is pressed, release it:
      if (Mouse.isPressed(MOUSE_LEFT)) {
         Mouse.release(MOUSE_LEFT);
      }
   }
   // a delay so the mouse does not move too fast:
   delay(responseDelay);
}
代码说明
使用micro-USB线将电路板连接到计算机。按钮连接到引脚2至6的数字输入。确保使用10k下拉电阻。
发布者:suiyublg,转转请注明出处:https://huibian.net/1407-2/